
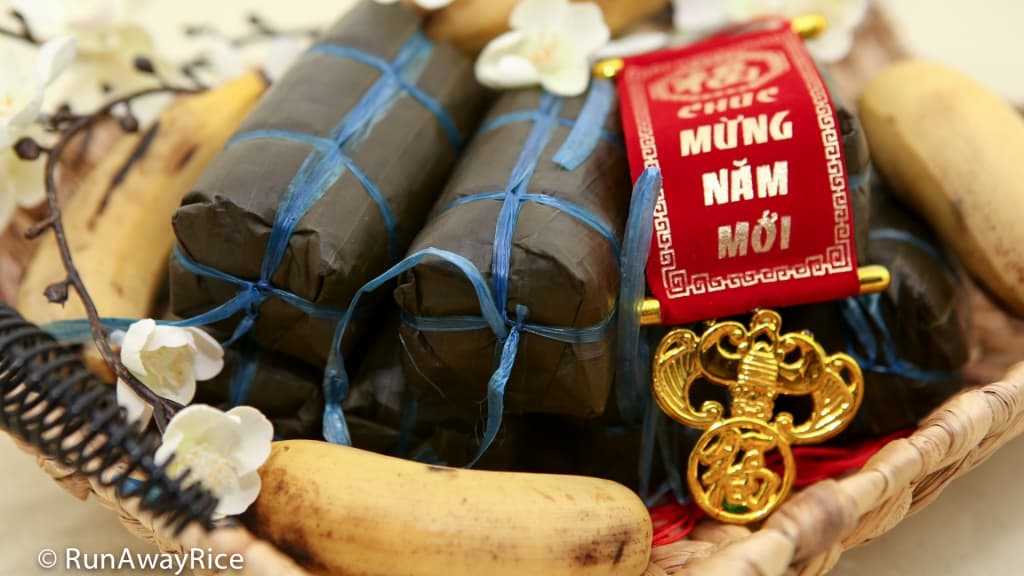
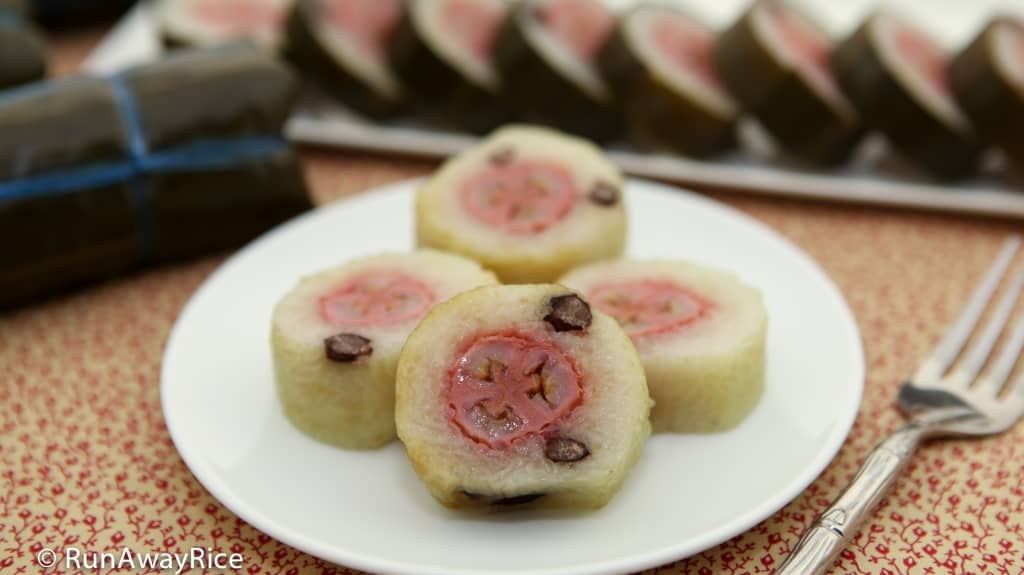
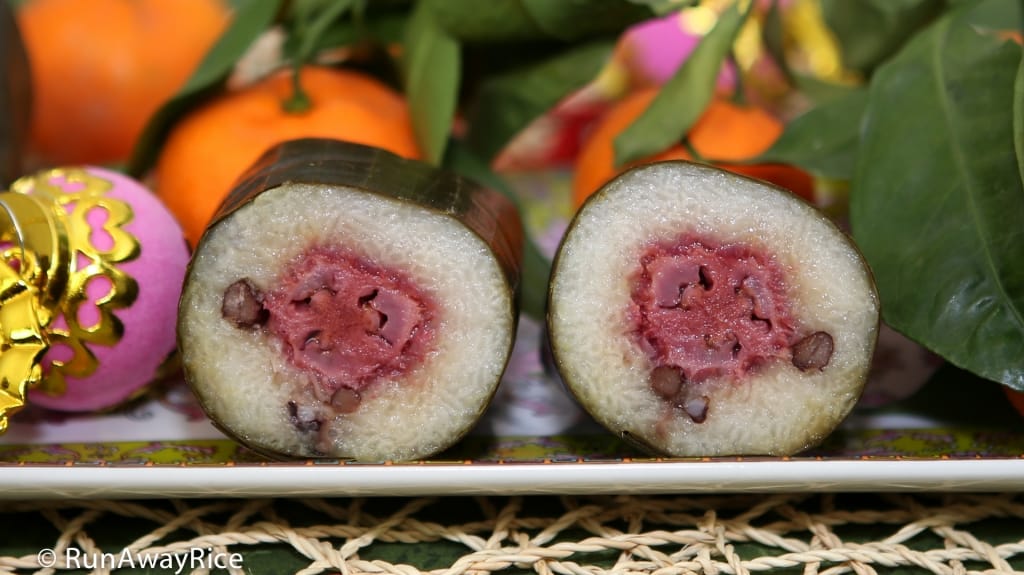
This Sticky Rice and Banana Cakes (Banh Tet Chuoi) recipe makes a wonderful sweet treat for Lunar New Year / Tet. Sweet ripened bananas are encased in a layer of sticky rice and black beans and then wrapped in banana leaves. The results are a deliciously, glutinous sweet cake with an intriguing pop of color and heavenly aroma. Something magical happens to the bananas during the cooking process and they turn a beautiful shade of pinkish red. If you’re not prepared for it, the rosy color may surprise you but that’s the intended result and a mark of success. I hope you give this fun recipe a try. It’s a quintessential recipe for enjoying Lunar New Year and a treat your family and friends will love!
Watch the video for instructions.

Notes on the Sticky Rice and Banana Cakes (Banh Tet Chuoi) Recipe, Tips and Tricks
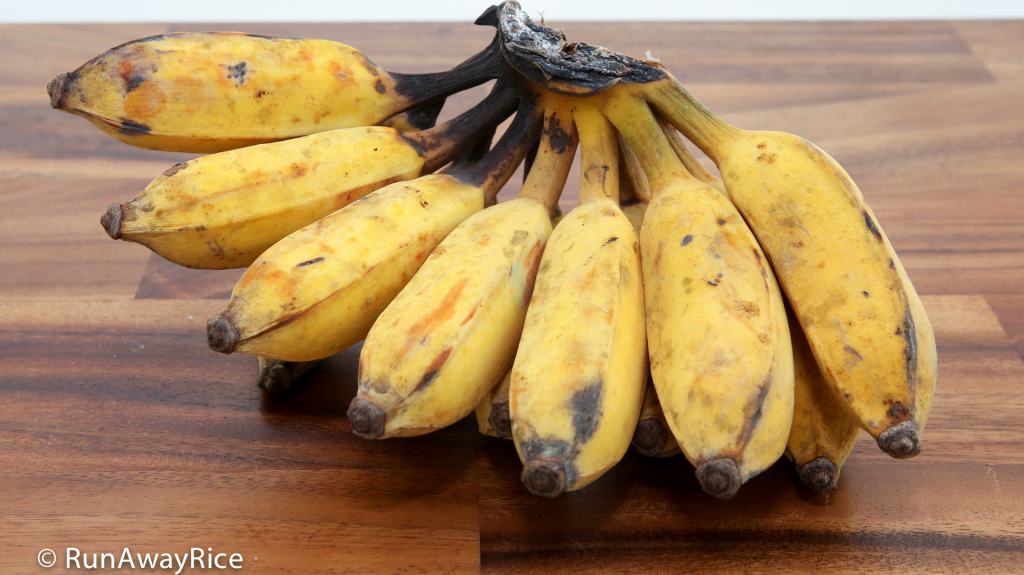
For best results use ripe Thai, Manzano (also called apple bananas) or Cavendish bananas. Other varieties of bananas may not turn pink/red when cooked. If you don’t care about the color, any ripe banana is just fine. The color does not affect the taste of the cakes. Plan ahead as bananas may take some time to ripen especially during the winter months. My bananas, purchased green, took 8 days to get to medium ripeness. Once ripened, the bananas should be dark yellow with some black patches. They should be soft when gently squeezed without being mushy. The best way to check if they are ripe is to eat one! Frozen bananas also work well too.
Wash the banana leaves the day before to break up the work. Store in the refrigerator until ready to use. If you need a refresher, check out the post: How to Prepare Banana Leaves
Use approximately 2/3 cup rice and beans mixture. For accuracy, weigh the rice and beans for each cake. Make 8 portions with each weighing 3.5 oz (100 g). The Sticky Rice and Banana Cakes each measure: 4 1/2 inches long with a circumference of 6 inches. The pre-cooked weight is about 5.6 oz (160 g), post-cook weight is 6.5 oz (185 g).
The black beans are an accent and so used sparingly. If you like more beans, feel free to add. The same goes for the sugar. Adjust to your taste.
It helps with shaping the cake if the rice and beans are warm–everything sticks together better. If the mixture becomes difficult to work with, microwave each portion for 15 seconds.
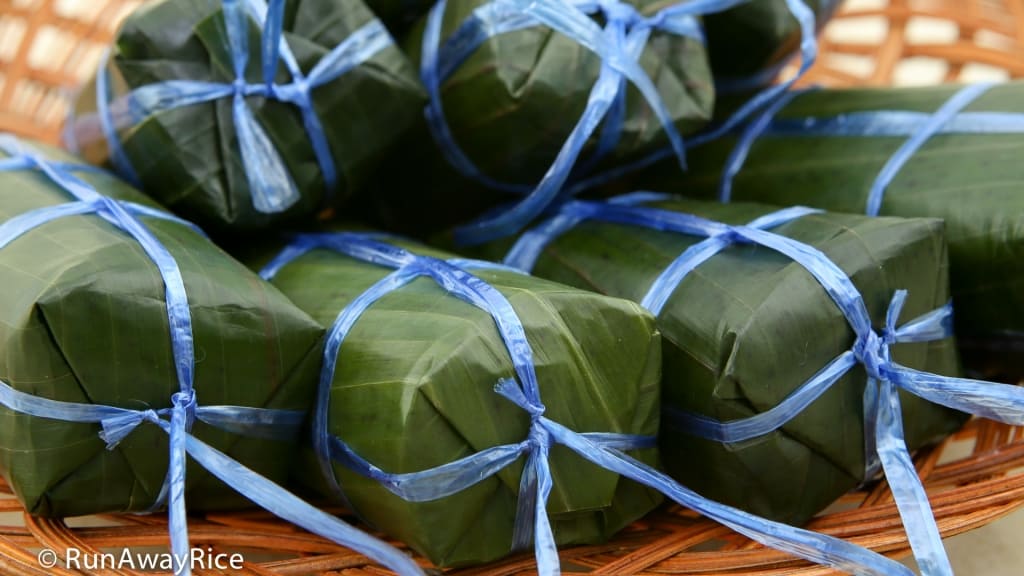
When tying the cakes with string, use moderate tension. The string should be taut enough to hold everything together but not so tight that it creases the banana leaves. You should be able to slide the string with your fingers if needed. The technique for tying the string makes the cakes unique and eye-catching. If working with string is not your forte, simply make a series of knots around the cake.
I am using a 5 quart pressure cooker for convenience and speed. If cooking on a stove, the process is similar. Place the cakes into a large pot and cover with water. Gently boil the cakes for 2 hours. Check the water levels occasionally and refill with boiling water only.
After pressuring cooking, the cakes should remain in the cooker for an additional 45 minutes in the “Keep Warm” mode. Extra time is okay as well. As an experiment, I let the cakes remain in the cooker overnight and they were just fine.
Store the Sticky Rice and Banana Cakes at room temperature for up to 2 days. Refrigerate for up to 2 weeks. Freeze the whole cakes for up to 6 months. To enjoy again, allow to come to room temperature and warm in the microwave using Low power.
If you enjoy this Sticky Rice and Banana Cakes (Banh Tet Chuoi) recipe, you may also like:
Sticky Rice and Mung Bean Cakes
(Banh Tet)
Steamed Banana Cake
(Banh Chuoi Hap)

Plantains, Cassava and Tapioca Pearls Dessert
(Che Chuoi Khoai Mi Bot Bang)
Sticky Rice and Banana Cakes / Banh Tet Chuoi
Ingredients
Cakes
2 1/2 cups long-grain glutinous/sweet rice
8 ripe Thai bananas
1 Tbsp rum
2 Tbsp sugar, divided
2 lbs banana leaves, cleaned
3 Tbsp canned black beans
1/3 cup coconut milk
1/4 tsp salt
Other Materials
ruler
12 inch string, used as a temporary tie
8 (5 feet) lengths of cooking string or twine
aluminum foil
plastic wrap
Directions
Preparing the Ingredients
Wash the glutinous rice by gently swirling in cold water. Drain the rinse water. Repeat this washing process 1-2 more times or until the rinse water is mostly clear. Fill the basin with warm water and let the rice soak for 2 hours.
Cut off the ends of the bananas. Add the rum into a large dish. Peel the bananas and place into the dish. Rotate the bananas, coating with the rum. Sprinkle the bananas with 1/2 Tbsp sugar. Flip the bananas over. Sprinkle with another 1/2 Tbsp sugar. Cover the dish and let marinate for 2 hours.
Cut the banana leaves into sheets measuring 8 inches by 8 inches. Make a total of 16 sheets.
Transfer the canned black beans into a medium colander. Rinse with cold water to wash off the canning liquid. Toss the beans in the colander a few times to drain the water.
Rinse the soaked glutinous rice with water one more time. Drain in a medium colander. Toss the rice in the colander to remove the excess water.
In a large wok, add the glutinous rice, coconut milk, remaining 1 Tbsp sugar and salt. Combining together, cook over Medium heat for 5 minutes. (The rice should start to stick together.) Turn off the heat and add the black beans. Gently combine together. Transfer the rice and beans mixture into a medium bowl. Cover with plastic wrap to keep warm.
Making the Cakes
Place the 12 inch string down on the work surface, positioned vertically. Place the first banana leaf on the work surface (on top of the string) with the shiny side down and veins running horizontally. Place the second banana leaf on top with the shiny side up and veins running vertically.
Transfer 2/3 cup rice and beans onto the center of the banana leaves. Spread out the mixture making a rectangle about 4 inches wide by 5 inches tall.
Place a banana on top centering with the rectangle.
Bring the banana leaves up and together, encasing the banana with the rice mixture. Use the banana leaves to press the rice together, making a roll.
Fold the excess leaves down toward the roll.
Tie the roll with the string making a temporary knot.
Fold the leaves over on the one end and then stand the cake up. Cut off the excess leaves. Using a small spoon, pat down the rice. Fold down the leaves covering the end.
Flip the cake onto the other end. Repeat the same steps with this end.
Tie the cake with a 5 feet length of string. (Please see the video for this part.)
Gently roll and shape the cake into a log.
Repeat the same steps until all 8 cakes are made.
Wrap each cake with aluminum foil.
Cooking the Cakes
Place the cakes horizontally into the inner pot of a 5 quart pressure cooker. Fill the pot with 10 cups warm water or enough to cover the cakes. Set the cooker to High pressure with a cook time of 45 minutes. (For the Cuckoo ICOOK Q5 Multi Cooker, use the “Meat” mode with the cook time set to 45 minutes.) Start the pressure cooker.
After the pressure cook time is completed, let the cakes remain in the cooker for another 45 minutes in the “Keep Warm” mode before opening the lid.
Using tongs, transfer the cakes into a medium colander. Remove the foil from each of the cakes. Rinse the cakes with cold water. Pat the cakes dry with a kitchen towel. Wrap each cake in plastic wrap.
Allow to cool for at least 2 hours.
Serving and Storing the Cakes
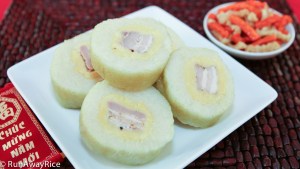
To Serve: Cut off the string. Unwrap the cake by removing the banana leaves and discarding. Cut the cake into slices using a sharp knife or with cooking twine.
Optionally, leave the banana leaves on the cake and cut the cake into slices. Before eating, remove the banana leaves from each slice.
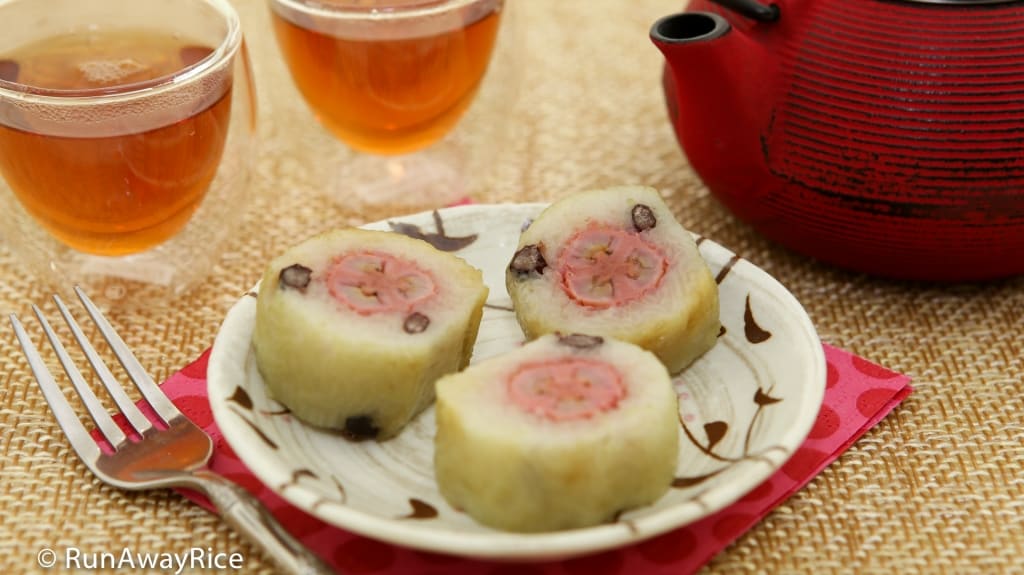
Enjoy the Sticky Rice and Banana Cakes as a snack or dessert with a cup of hot tea or coffee.
Store the Sticky Rice and Banana Cakes at room temperature for up to 2 days. Refrigerate for up to 2 weeks. Freeze the whole cakes for up to 6 months.
Yields: 8 cakes
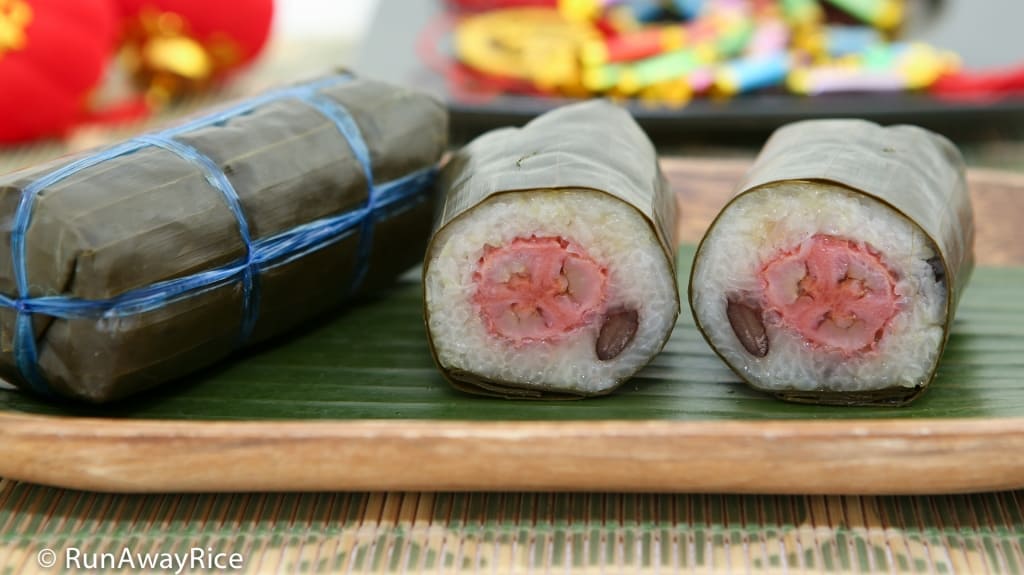
In case you’re curious, I let the same batch of bananas ripen for another 3 days and below are the results. Notice how the bananas have a richer more vibrant color. By the way, the gorgeous rosy red color is the result of heating sugar and potassium.

Sticky Rice and Banana Cakes (Banh Tet Chuoi)
This Sticky Rice and Banana Cakes (Banh Tet Chuoi) recipe makes a wonderful sweet treat for Lunar New Year / Tet. Sweet ripened bananas are encased in a layer of sticky rice and black beans and then wrapped in banana leaves. The results are a deliciously, glutinous sweet cake with an intriguing pop of color and heavenly aroma. Something magical happens to the bananas during the cooking process and they turn a beautiful shade of pinkish red. If you're not prepared for it, the rosy color may surprise you but that's the intended result and a mark of success. I hope you give this fun recipe a try. It's a quintessential recipe for enjoying Lunar New Year and a treat your family and friends will love!
Ingredients
Cakes
- 2 1/2 cups long-grain glutinous/sweet rice
- 8 ripe Thai bananas
- 1 Tbsp rum
- 2 Tbsp sugar , divided
- 2 lbs banana leaves , cleaned
- 3 Tbsp canned black beans
- 1/3 cup coconut milk
- 1/4 tsp salt
Other Materials
- ruler
- 12 inch string , used as a temporary tie
- 8 (5 feet) lengths of cooking string or twine
- aluminum foil
- plastic wrap
Instructions
Preparing the Ingredients
-
Wash the glutinous rice by gently swirling in cold water. Drain the rinse water. Repeat this washing process 1-2 more times or until the rinse water is mostly clear. Fill the basin with warm water and let the rice soak for 2 hours.
-
Cut off the ends of the bananas. Add the rum into a large dish. Peel the bananas and place into a large dish. Rotate the bananas, coating with the rum. Sprinkle the bananas with 1/2 Tbsp sugar. Flip the bananas over. Sprinkle with another 1/2 Tbsp sugar. Cover the dish and let marinate for 2 hours.
-
Cut the banana leaves into sheets measuring 8 inches by 8 inches. Make a total of 16 sheets.
-
Transfer the canned black beans into a medium colander. Rinse with cold water to wash off the canning liquid. Toss the beans in the colander a few times to drain the water.
-
Rinse the soaked glutinous rice with water one more time. Drain in a medium colander. Toss the rice in the colander to remove the excess water.
-
In a large wok, add the glutinous rice, coconut milk, remaining 1 Tbsp sugar and salt. Combining together, cook over Medium heat for 5 minutes. (The rice should start to stick together.) Turn off the heat and add the black beans. Gently combine together. Transfer the rice and beans mixture into a medium bowl. Cover with plastic wrap to keep warm.
Making the Cakes
-
Place the 12 inch string down on the work surface, positioned vertically. Place the first banana leaf on the work surface (on top of the string) with the shiny side down and veins running horizontally. Place the second banana leaf on top with the shiny side up and veins running vertically.
-
Transfer 2/3 cup rice and beans onto the center of the banana leaves. Spread out the mixture making a rectangle about 4 inches wide by 5 inches tall.
-
Place a banana on top centering with the rectangle.
-
Bring the banana leaves up and together, encasing the banana with the rice mixture. Use the banana leaves to press the rice together, making a roll.
-
Fold the excess leaves down toward the roll.
-
Tie the roll with the string making a temporary knot.
-
Fold the leaves over on the one end and then stand the cake up. Cut off the excess leaves. Using a small spoon, pat down the rice. Fold down the leaves covering the end.
-
Flip the cake onto the other end. Repeat the same steps with this end.
-
Tie the cake with a 5 feet length of string. (Please see the video for this part.)
-
Gently roll and shape the cake into a log.
-
Repeat the same steps until all 8 cakes are made.
-
Wrap each cake with aluminum foil.
Cooking the Cakes
-
Place the cakes horizontally into the inner pot of a 5 quart pressure cooker. Fill the pot with 10 cups warm water or enough to cover the cakes. Set the cooker to High pressure with a cook time of 45 minutes. (For the Cuckoo ICOOK Q5 Multi Cooker, use the "Meat" mode with the cook time set to 45 minutes.) Start the pressure cooker.
-
After the pressure cook time is completed, let the cakes remain in the cooker for another 45 minutes in the "Keep Warm" mode before opening the lid.
-
Using tongs, transfer the cakes into a medium colander. Remove the foil from each of the cakes. Rinse the cakes with cold water. Pat the cakes dry with a kitchen towel. Wrap each cake in plastic wrap.
-
Allow to cool for at least 2 hours.
Serving and Storing the Cakes
-
To Serve: Cut off the string. Unwrap the cake by removing the banana leaves and discarding. Cut the cake into slices using a sharp knife or with cooking twine.
-
Optionally, leave the banana leaves on the cake and cut the cake into slices. Before eating, remove the banana leaves from each slice.
-
Enjoy the Sticky Rice and Banana Cakes as a snack or dessert with a cup of hot tea or coffee.
-
Store the Sticky Rice and Banana Cakes at room temperature for up to 2 days. Refrigerate for up to 2 weeks. Freeze for up to 6 months.
Recipe Video
Notes, Tips & Tricks
- For best results use ripe Thai, Manzano (also called apple bananas) or Cavendish bananas. Other varieties of bananas may not turn pink/red when cooked. If you don't care about the color, any ripe banana is just fine. The color does not affect the taste of the cakes. Plan ahead as bananas may take some time to ripen especially during the winter months. My bananas, purchased green, took 8 days to get to medium ripeness. Once ripened, the bananas should be dark yellow with some black patches They should be soft when gently squeezed without being mushy. The best way to check if they are ripe is to eat one! Frozen bananas also work well too.
- Wash the banana leaves the day before to break up the work. Store in the refrigerator until ready to use. If you need a refresher, check out the post: How to Prepare Banana Leaves.
- Use approximately 2/3 cup rice and beans mixture. For accuracy, weigh the rice and beans for each cake. Make 8 portions with each weighing 3.5 oz (100 g). The Sticky Rice and Banana Cakes each measure: 4 1/2 inches long with a circumference of 6 inches. The pre-cooked weight is about 5.6 oz (160 g), post-cook weight is 6.5 oz (185 g).
- The black beans are an accent and so used sparingly. If you like more beans, feel free to add. The same goes for the sugar. Adjust to your taste.
- It helps with shaping the cake if the rice and beans are warm--everything sticks together better. If the mixture becomes difficult to work with, microwave each portion for 15 seconds.
- When tying the cakes with string, use moderate tension. The string should be taut enough to hold everything together but not so tight that it creases the banana leaves. You should be able to slide the string with your fingers if needed. The technique for tying the string makes the cakes unique and eye-catching. If working with string is not your forte, simply make a series of knots around the cake.
- I am using a 5 quart pressure cooker for convenience and speed. If cooking on a stove, the process is similar. Place the cakes into a large pot and cover with water. Gently boil the cakes for 2 hours. Check the water levels occasionally and refill with boiling water only.
- After pressuring cooking, the cakes should remain in the cooker for an additional 45 minutes in the "Keep Warm" mode. Extra time is okay as well. I've left cakes in the cooker overnight and they were just fine.
- Store the Sticky Rice and Banana Cakes at room temperature for up to 2 days. Refrigerate for up to 2 weeks. Freeze the whole cakes for up to 6 months. To enjoy again, allow to come to room temperature and warm in the microwave using Low power.


Hi! I don’t have rum so I’m hesitant to buy a whole bottle when I only need a tablespoon. I have amaretto; would that work? Or is there anything else I can substitute the rum with? Thank you!!
You can omit it if you don’t have rum. Amaretto isn’t quite right.
First time trying and it turned out so well! But I’m curious about wrapping them in tin foil- what’s the benefit or reasoning? Can I cook them without the tin foil wrap?
Hi Alg,
Great job! I am glad you enjoyed the recipe. Regarding your question, the foil helps to reinforce the banana leaves. Sometimes the banana leaves get torn during wrapping or cooking and the foil adds an extra layer of wrap. You can skip wrapping with foil if your cakes are well-wrapped and the leaves don’t have any holes or tears. Thanks for stopping by!
Is it ok to still use bananas that I left in rum and sugar for a few days in the fridge?
Hi Lisa,
Marinating overnight or longer is just fine. The bananas will be delicious! I hope you enjoy the recipe. 🙂
Hi Trang,
Can you use the same method with the rice (cooking it first slightly) to make Banh Tet (with pork belly)? It is so much easier to roll this way than keeping it raw.
Thanks so much!
PS love your easy to follow and delicious recipes 🙂
How long do i cook for if i dont ise a pressure cooker
Hi Trang,
Cooking on the stove, gently boil the cakes for 2 hours. Be sure to cover the cakes with plenty of water. Good Luck!
Thank you Trang for your wonderful recipes and methods of cooking Vietnamese food. I love being able to make all of my favorites. Your teachings & techniques are detailed with great directions. The videos help tremendously. I’m making the Banh Tet for my family. I also refer to your site whenever I’m in the mood for some traditional home dishes. It’s the best one online! Chuc mung nam moi!
Hi Gina,
Thank you for your kind words. I really appreciate your interest and support for my blog. Chuc Mung Nam Moi to you and your family!
I’m scared and excited to give this recipe a go! I hope it turns out well! Eek! I’ll keep you updated Trang! Thanks for using the pressure cooker. One more thing my Instant Pot can handle!
Good Luck Ann! Let me know how your cakes turn out…fingers crossed! 🙂
Hi Chi, i have just finished wrapping the Banh Tet followed your récipe. Im using the pressure cook as well but im not clear. After 45mins of cooking and leave Banh Tet in there with the power off or keep it in warm mode?
Hi Pearl, after pressuring cooking for 45 minutes, let the cakes rest in the Keep Warm mode. I hope that helps. Good Luck!
Hi,
Love Vietnamese food, and your site has great recipes. I was wondering if you would post a recipe for Banh Nam (flat rice cakes wrapped in banana leaf & has ground pork & shrimp on top) one of these days.
Thank you,
Jane
Hi Jane,
Banh nam is on the list for an upcoming post. Please stay tuned.
Hi chi Trang, I love this recipe uses a pressure cooker. The recipe is easy and after watching your video I know how to tie the cakes. They look so pretty. I am going to make another batch to give to my parents for Tet. Thanks for sharing this awesome recipe!
Hi Hieu,
I am so glad to hear you enjoyed the recipe. Yes, tying the cakes with string is easy after the first one. These cakes make wonderful gifts and I am sure your parents will love your thoughtfulness! 🙂