
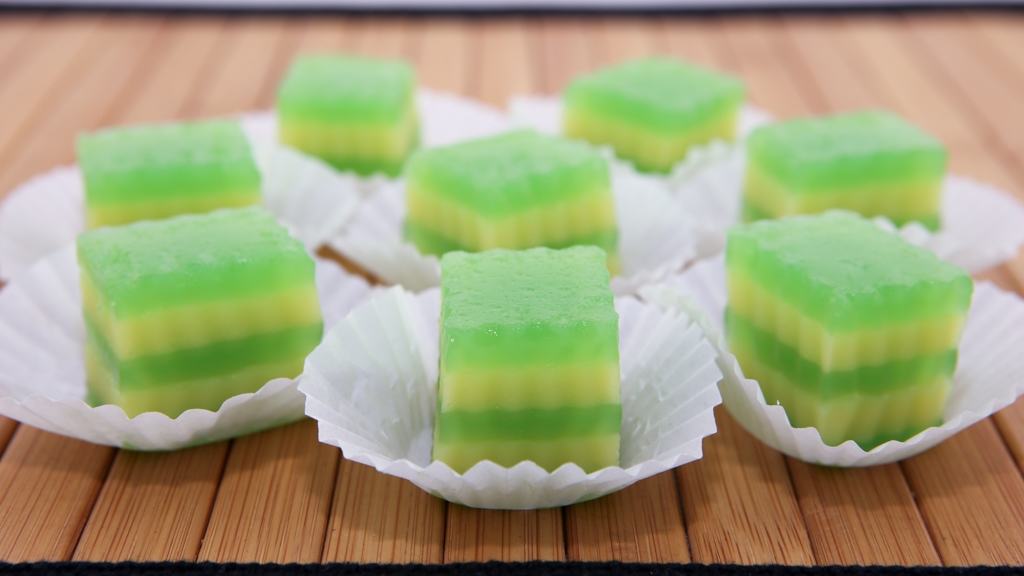
Mildly sweet with a chewy and sticky texture, this scrumptious steamed layer cake is a popular sweet treat that can be found in almost every Vietnamese bakery and grocery store. The cake has such visual appeal with its vivid green and yellow layers and if you’ve ever wondered how this cake is made, wonder no more friends! This post takes you through the recipe step-by-step and it’s really easy. In addition, I share all the recipe tips and tricks so you can make this cake successfully every time. Before trying the recipe, please read the below and watch the video. Enjoy!
Notes on the Recipe, Tips and Tricks
The steaming technique is very important in this recipe. Unlike some recipes where you try to generate as much steam as possible, this recipe is just the opposite. The steam is gentle but constant. Start by filling the steamer basin just half-way with water. After bringing the water to a rapid boil, reduce the heat to Low for the duration of the steaming. Too much heat and steam will cause the cake to bubble and blister and become tough. If you see the bubbles in the cake, reduce the heat.
Removing the lid throughout the cooking process to release the steam is a trick for getting a nice, smooth texture.
Ideally have a cake pan that just fits your steamer. If the pan is really small in relation to the steamer and there is too much steam circulating, the cake may develop some bubbles. It’s not the end of the world. The cake will still taste delicious and most of the bubbles will go away once the cake cools.
Stir the batter before making each layer. The green layer has a tendency to settle so make sure to mix it really well.
This recipe accommodates a 9-inch x 1.5-inch high round cake pan. If you have a slightly larger cake pan, you can add more water or coconut milk to stretch the batters.
Check to see if a layer is done by lightly touching the cake with the back of a spoon. If no batter sticks to the spoon, the cake is done. If any batter sticks to the spoon, steam for another minute and then check again. Below are the approximate steam times for each layer:
- Layer 1 Green – 10 minutes
- Layer 2 Yellow – 10 minutes
- Layer 3 Green – 12 minutes
- Layer 4 Yellow – 14 minutes
- Layer 5 Green – 15 minutes
For the mini muffin pans, I make just 3 layers. Use 1 tsp of green batter and 1 1/2 tsp of yellow batter. The steam times are:
- Layer 1 Green – 2 minutes
- Layer 2 Yellow – 3 minutes
- Layer 3 Green – 5 minutes
Watch the video for instructions.
If you enjoy this recipe, you may like: Tapioca and Mung Bean Cake (Banh Xu Xe/Banh Phu The)
Ingredients
Green Layer
1 1/2 cups tapioca starch
1/4 cup rice flour
3/4 cup sugar
2 cups water
1/4 tsp Pandan paste
1/4 tsp vegetable oil
Yellow Layer
1/2 cup peeled split mung bean
1/8 tsp salt
1 3/4 cups water
3/4 cup tapioca starch
2 Tbsp rice flour
3/4 cup sugar
4 oz coconut milk
2 drops yellow food coloring
Directions
Wash the mung bean by rinsing with cool water 3 times. Cover the beans with hot water and let soak for 2 hours.
Rinse the beans with cool water again and drain well.
Transfer the beans into a saucepan along with the salt and 1 3/4 cups water. Bring to a boil over High heat. Stir and then reduce the heat to Low. Skim off the foam and discard. Cook the beans until the liquid is completely absorbed, approximately 15 minutes. Remove from the heat and let cool completely.
For the yellow batter, add the cooked mung beans, tapioca starch, rice flour, sugar, coconut milk, and food coloring into the blender and mix on High for 30-45 seconds or until smooth. Measure out 18 oz of the yellow batter and set aside for now.
To make the green batter, combine tapioca starch, rice flour and sugar in a large measuring cup. Add the water and stir until the mixture is smooth. Add the pandan paste and mix well. This should yield 24 oz. (If less, add water until you have 24 oz of batter.)
Using a paper towel, coat the cake pan with a thin layer of vegetable oil.
Fill the steamer basin halfway with water and then bring to a boil over High heat. Reduce the heat to Low. Place the empty cake pan into the steamer and steam for 2 minutes.
Layer 1: Stir the green batter. Measure out 8 oz of batter and pour into the cake pan. Cover and steam for 5 minutes. Remove the lid to release the steam. Cover and steam for another 5 minutes.
Layer 2: Stir the yellow batter. Measure out 9 oz of batter and gently pour over the first layer. Cover and steam for 5 minutes. Remove the lid to release the steam. Cover and steam for another 5 minutes.
Layer 3: Stir the green batter. Measure out 8 oz of batter and gently pour over the back of a large spoon and into the cake pan. Cover and steam for 6 minutes. Remove the lid to release the steam. Cover and steam for another 6 minutes.
Layer 4: Stir the yellow batter. Pour the remaining batter into the pan. Cover and steam for 7 minutes. Remove the lid to release the steam. Cover and steam for another 7 minutes.
Layer 5: Stir the green batter. Gently pour the remaining batter over the back of a large spoon and into the cake pan. Cover and steam for 7 minutes. Remove the lid to release the steam. Cover and steam for another 8 minutes.
Remove from the steamer and let cool for at least 1 hour.
Oil a large knife or wavy knife with vegetable oil. Cut the cake into small pieces. Enjoy!
Store any leftover cake in an air-tight container in the refrigerator. It’s good for up to 1 week. Optionally, freeze the cake for up to 2 months. To reheat, microwave on Low for 20-30 seconds.
Yields: 8-10 servings

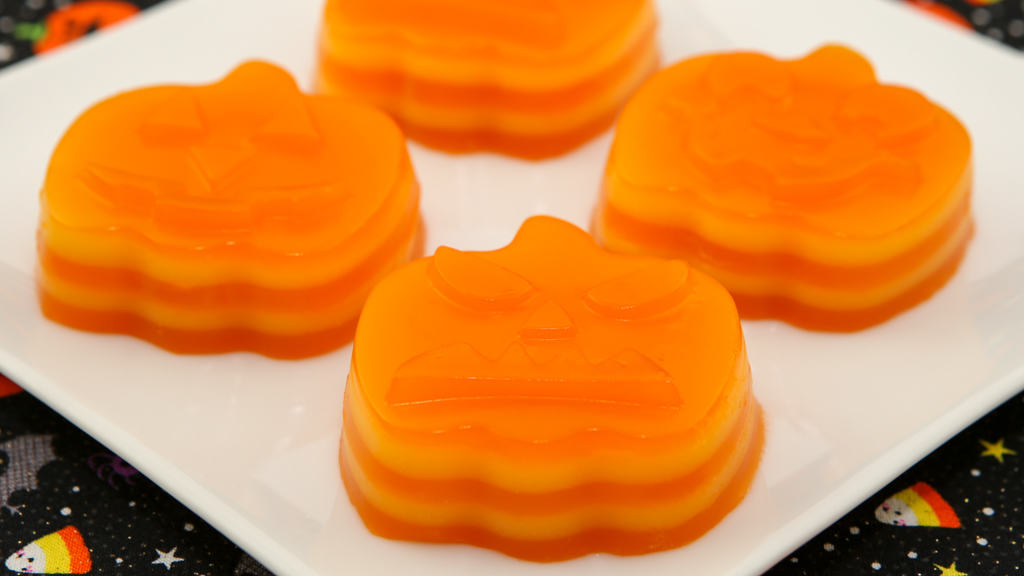
Recipe Twist!
For a fun Halloween treat, swap out the Pandan paste for orange food coloring and make the cakes using these cute pumpkin silicone molds. For each layer use 1 Tbsp of batter. Steam each layer until it’s no longer tacky. Approximate steam times are:
Layer 1 Orange – 3 minutes
Layer 2 Yellow – 3 minutes
Layer 3 Orange – 5 minutes
Layer 4 Yellow – 7 minutes
Layer 5 Orange – 8 minutes
*This post contains affiliate links.*


these were amazing..thanks for sharing!
Hi Cindy, I am glad to hear you enjoyed this recipe! 🙂
Hi Trang!
How would I go about omitting the pandan paste and creating a coffee flavoured version of this lovely Vietnamese classic?
Hi Gemma,
Replace the water in the green layer with brewed coffee. Make it as strong or as light as you prefer. Good luck with the recipe and please stop back to share your results.
for the banh da lon, the yellow part my blender didn’t blend because the yellow part too thick or my blender is not enough power, can use in another way
Hi Chi Tat,
Try this alternative if your blender is not powerful enough: Blend just the cooked mung beans with the coconut milk and sugar until smooth. Now add the tapioca starch and rice flour to the blended mung bean and mix together by hand.
Good Luck!
why do we need 1 1/2 cup tapioca starch and 1/4 cup of rice flour for the green layer? just wondering…
Hi, that combination starch/flour is needed to get the right balance chewy and soft cake. Hope that helps.
Hi Trang! For this recipe, is it okay to use glutinous rice flour instead of rice flour?
Thank you!
Hi Julie,
The rice flour is used to tone-down the stickiness of the tapioca starch. Glutinous rice flour is not the right substitute as it also has the sticky component. It won’t ruin the cake if you use glutinous rice flour but I recommend you use rice flour or just use all tapioca starch. Good Luck!
Hi Trang,can you please advise what the correct size of the cup used for the measurement for the Banh Da Lon.Thanks
Hi Michael,
I use an American cup which is 8 fluid ounces or 240 ml. Hope that helps.
Thanks so much for the recipe! I have always wanted to try making this. But when I mixed the yellow batter together, it only came out to 14 ounces? Not 18.
Hi Mai,
Just add more water or coconut milk until you have 18 ounces. I also try to scrape out every bit of the batter from the blender. Hope that help! 🙂
Hi Trang,
I just want to thank you of your recipes, easy to make cut down of sugar, keep posting a new one love it a lot of, I will try how to make banh da lon today. Thanks again
Hi Lynn,
It’s my pleasure and I am so happy to share my recipes. I try to reduce the sugar in most of the desserts 🙂 Good luck with your Banh Da Lon. Please let me know how it turns out for you.
Hi Trang, banh da lon came out pretty good. Thanks again. Oh I forgot tell you about Japanese cheese cake, pound cake so yummy too. I baked them 2 weeks ago. I’m your fan now, love you.
Hi Lynn,
I am glad to hear you enjoyed the banh da lon and Japanese cheesecake recipes. Thank you for taking the time to share your results. I really appreciate your support 🙂
Hi Trang,
I’m still waiting for a new sweet things, or some thing please post on. Thank’s.
Hi Lynn,
Is there a particular “sweet” recipe you’re interested in? 🙂
Hi Trang,
By using mini muffin tray, will the steam time be same at 10 min. each layer?
Thank you.
Hi Thanh-Van,
For the mini muffin pans, I make just 3 layers. Use 1 tsp of green batter and 1 1/2 tsp of yellow batter. The steam times are: Layer 1 Green – 2 minutes, Layer 2 Yellow – 3 minutes, Layer 3 Green – 5 minutes
Let me know if you have any questions! 🙂
If we use cupcake molds to steam the cake, how long is the cooking time for each stage please?
Hi Ann,
Mini-Muffins: Layer 1 Green – 2 minutes, Layer 2 Yellow – 3 minutes, Layer 3 Green – 5 minutes
Regular Muffins: Layer 1 Green – 3 minutes, Layer 2 Yellow – 3 minutes, Layer 3 Green – 5 minutes, Layer 4 Yellow – 7 minutes, Layer 5 Green – 8 minutes
Hope you give the recipe a try!