
This Honeycomb Cake – Eggless / Vegetarian Recipe (Banh Bo Nuong Chay) is a must-try if you love baked Honeycomb Cake (Banh Bo Nuong) but want to avoid the eggs. You are guaranteed a deliciously spongy and chewy cake with lots of honeycomb with this straightforward recipe. If you’ve struggled with making Honeycomb Cake in the past, give this recipe a try. It’s very forgiving and not nearly as delicate or sensitive as the Steamed Honeycomb Cake or baked version. Be sure to review the recipe notes and watch the video. It’s loaded with tips and tricks to help you succeed. Good Luck and Happy Baking!
Notes on the Honeycomb Cake – Eggless / Vegetarian Recipe, Tips and Tricks
Use fresh active dry yeast. Instant yeast works but the honeycomb is minimal and the texture is not as spongy.
Let the batter rest in a warm place with the temperature around 85-100 F (29-38 C) to encourage yeast growth. The oven works best as it’s enclosed and can be controlled. Turn on the oven light and place the batter bowl close to the light. Another option is to place a pan of boiling water just under the batter. The steam helps to generate heat. Alternatively, warm the oven using the “Keep Warm” function for a few minutes and then turn it off. With this method, you should use an oven thermometer to get the right temperature range. Most ovens keep warm at 175 F (79 C), a temperature which would kill the yeast. If you have a bread proofing setting on your oven, this works best and eliminates any guesswork.
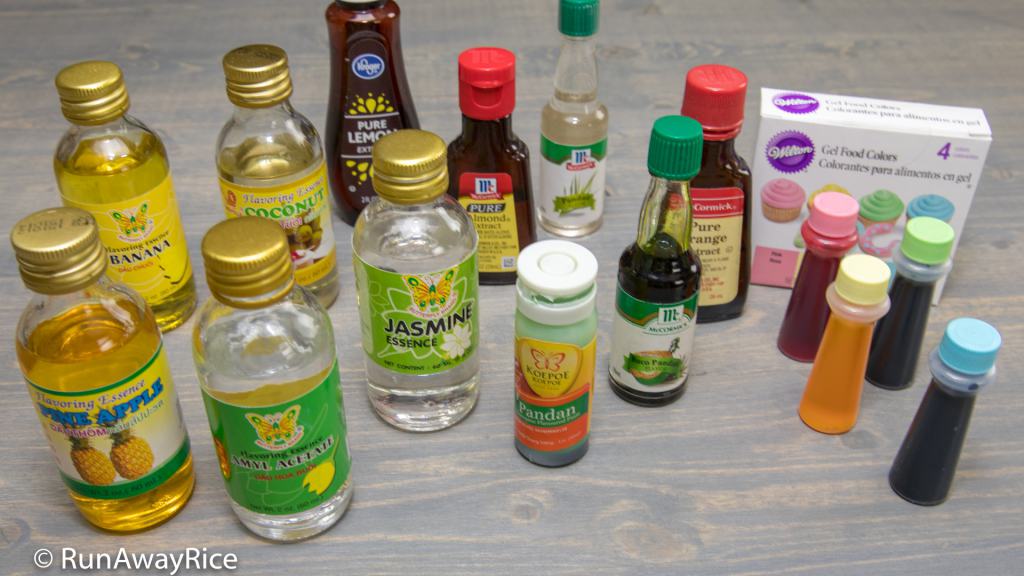
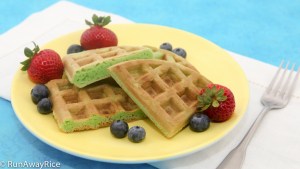
I use Pandan paste in this recipe because it’s my favorite. Feel free to use any food extract and flavoring you like. Optionally, use food coloring to add pizzazz to the cake. Depending on the occasion or time of year, I’ll make a variety of cakes in different flavors and colors. Yum! Check out my ever-expanding collection below… 🙂
Use a thermometer to check the temperature of all liquids. The temperature should be 100-110 F (38-43 C). A temperature high than 130 F (54 C) will kill the yeast.
Temperatures and baking times may vary with your oven. Adjust the oven rack so the cake is at least 7-8 inches from oven’s heating element. The reasoning for this is so the cake doesn’t bake too quickly. Time is needed to let the air bubbles surface to the top, thereby creating the honeycomb. If your oven has both top and bottom heating elements, center the cake in the oven. Bake using conventional heat. Convection or fan-forced dries out the cake.
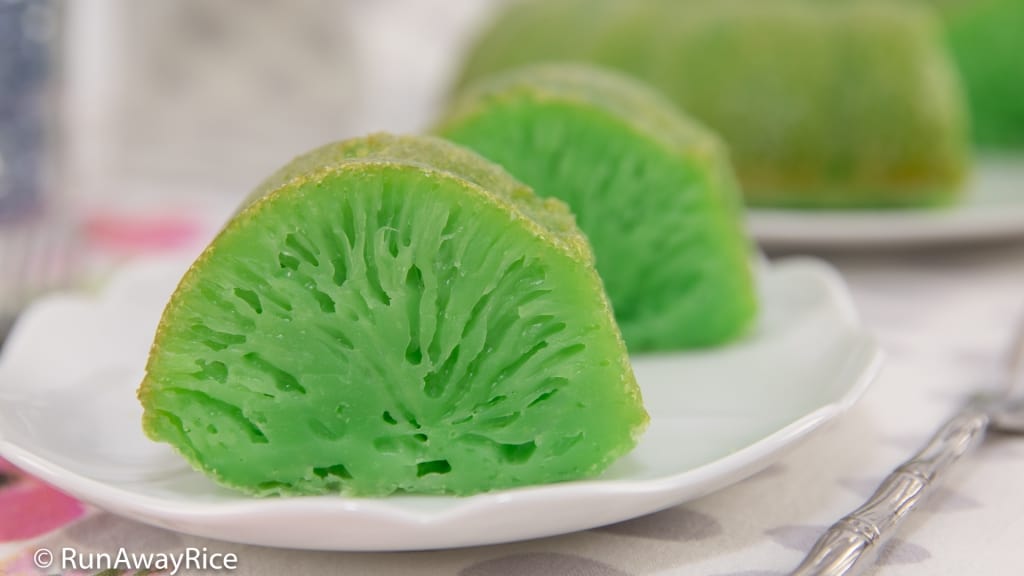
As rice flour yields a flaky crust, I cover the cake with foil. I like a delicate, softer texture similar to the Steamed Honeycomb Cake. If you don’t mind a little bit of crust, you can bake the cake uncovered and it will take less time. An uncovered cake made using a tube / bundt pan bakes in 30-35 minutes.
The Honeycomb Cake – Eggless is best enjoyed the day it’s made. For any remaining cake, cover well to prevent drying. Store at room temperature for 1-2 days. Refrigerate for up to 1 week. To enjoy again, warm in the microwave or toaster oven. Freeze for up to 2 months.
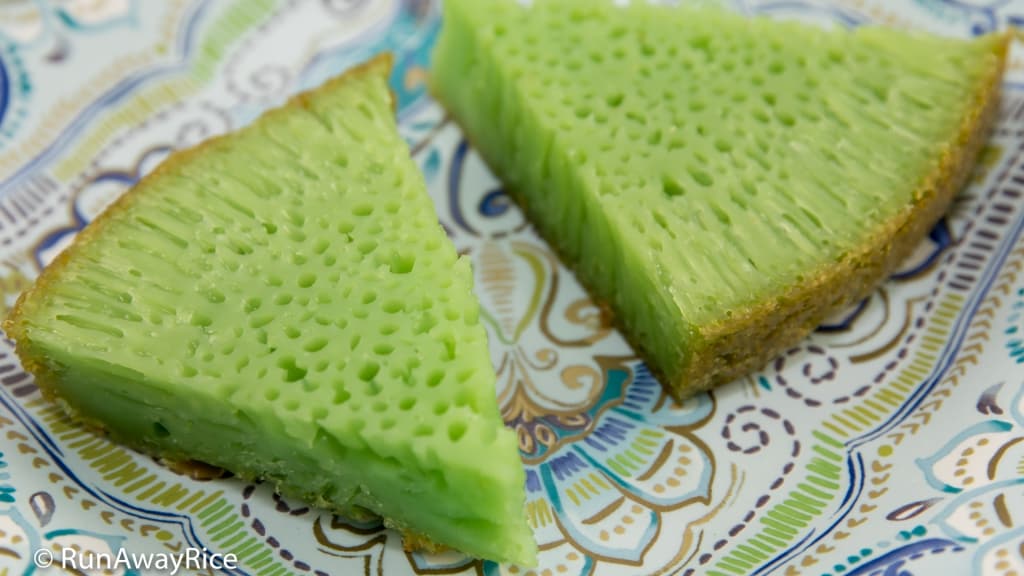
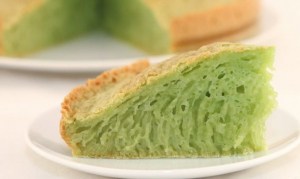
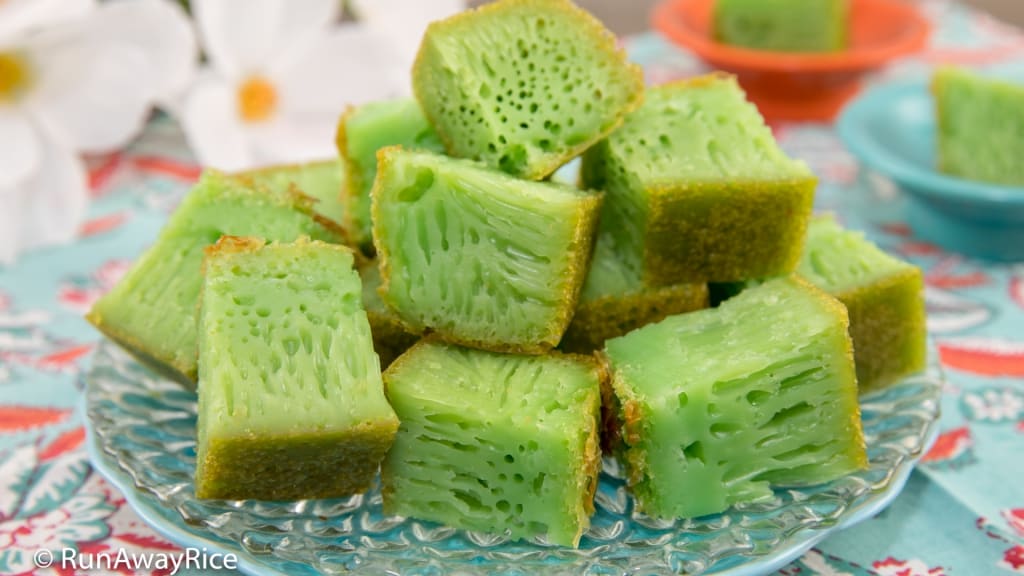
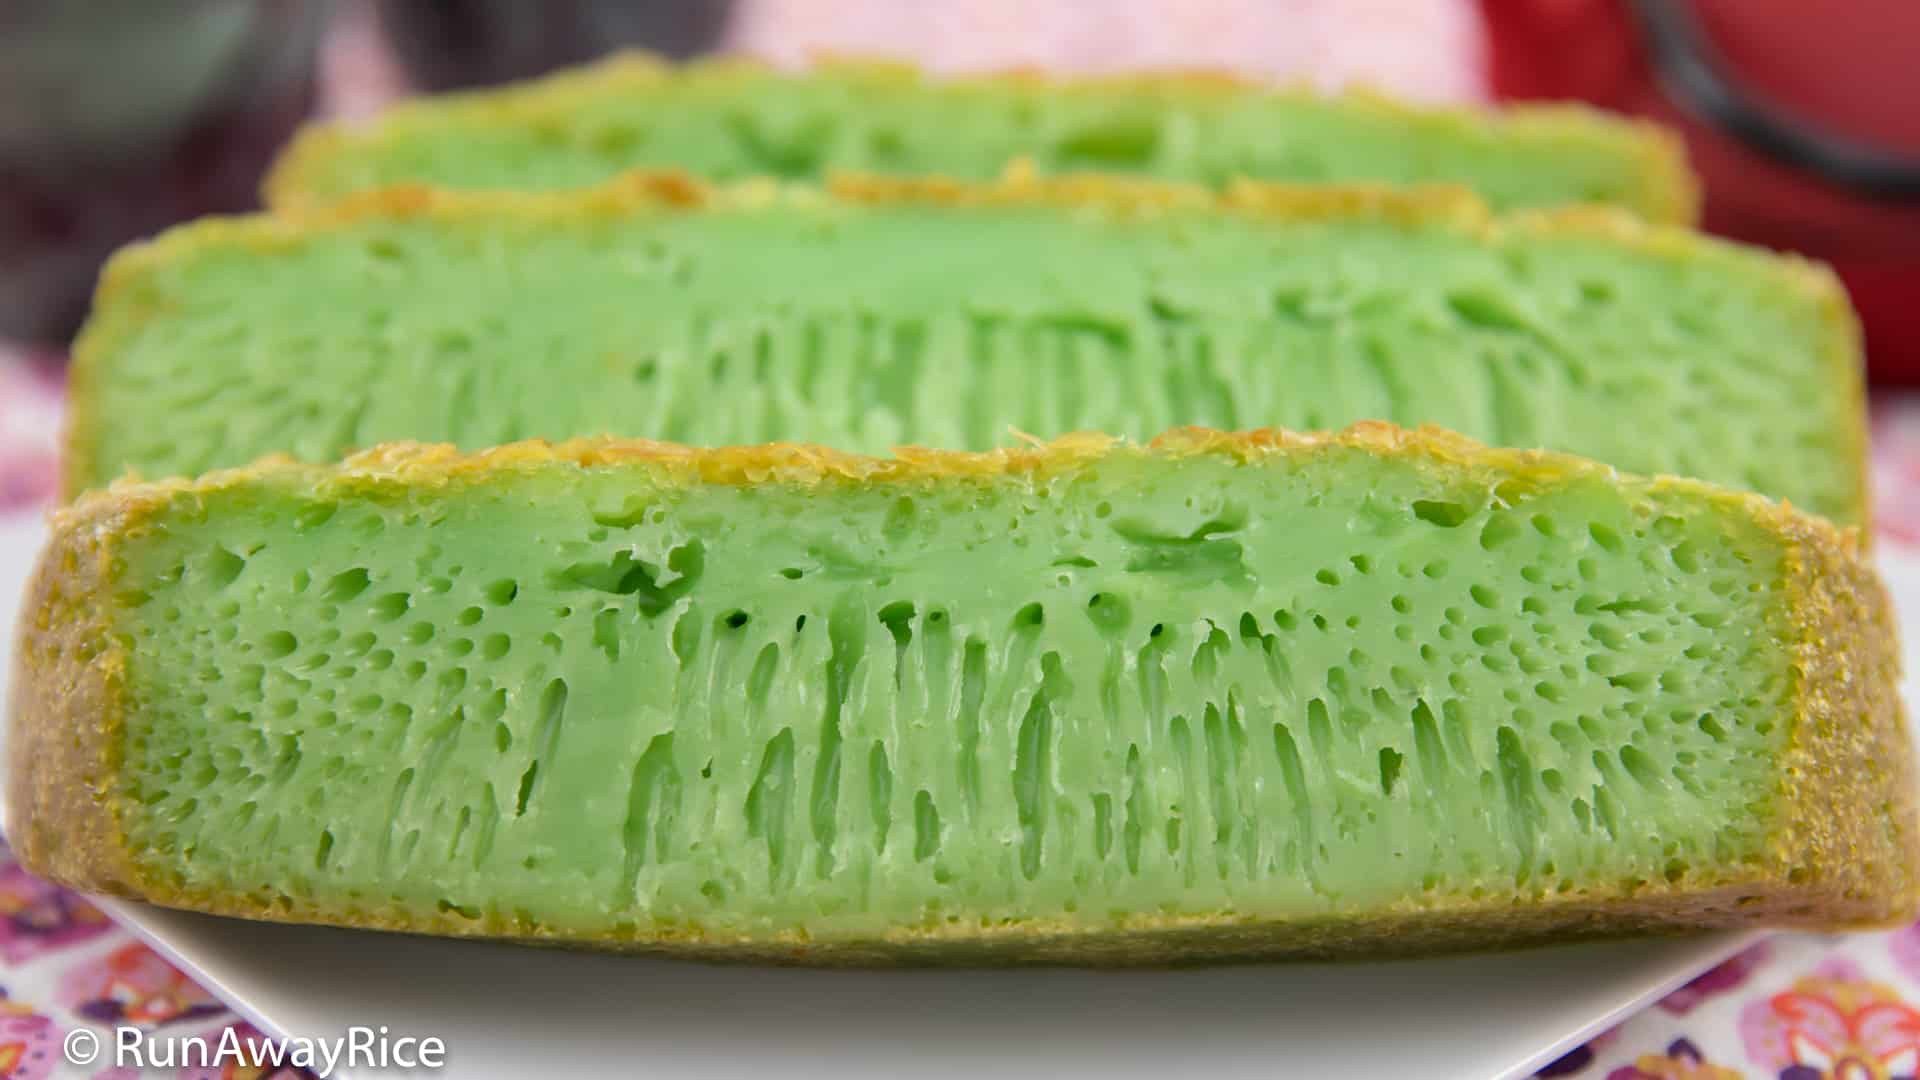
Gas bubbles surfacing to the top create the striations in this cake. Cut across the cake to reveal the beautiful honeycomb.
Watch the video for instructions.
If you enjoy this Honeycomb Cake – Eggless / Vegetarian (Banh Bo Nuong Chay) recipe, you may also like:
Steamed Rice Cakes / Cow Cakes / Steamed Honeycomb Cake (Banh Bo Hap)
Honeycomb Cake (Banh Bo Nuong)
Honeycomb Cake – Eggless / Vegetarian Recipe / Banh Bo Nuong Chay

Ingredients
Yeast Mixture
1 package (2 1/4 tsp) active dry yeast
1 tsp sugar
1/4 cup warm water, 100 F (38 C)
Cake Batter
2 1/2 cups rice flour
1 1/2 cups tapioca starch
2 cups warm water, 100 F (38 C)
1 cup coconut milk
1 cup sugar
1 tsp Pandan paste
1 tsp vegetable oil
Directions
Activating the Yeast
In a small bowl, add the active dry yeast, 1 tsp sugar and warm water. Stir together to moisten the yeast.
Let rest until the yeast becomes foamy and doubles in volume, approximately 10 minutes.
Making the Batter
Add the rice flour and tapioca starch into a large bowl. Add the warm water. Mix together until the batter is smooth and free of lumps.
Optionally, strain the mixture.
Add the activated yeast to the batter. Mix together combining well. Cover the bowl with a lid or plastic wrap.
Transfer to a warm place and let rest for 1 – 1 1/2 hours or until the batter increases 1 1/2 times in volume and is foamy on top.
In a microwaveable cup, add the coconut milk and 1 cup sugar. Combine together dissolving the sugar. Microwave on High for 45 seconds.
Add the Pandan paste to the coconut milk syrup and mix well.
Add the Pandan coconut milk syrup to the batter and mix well.
Cover the batter and let rest on the counter for 15 minutes.
Baking the Cake using a 10 inch Tube / Bundt Cake Pan
Place the tube / bundt cake pan into the oven. Preheat the oven to 350 F (177 C).
When the oven comes to temperature, remove the hot pan from the oven. Brush oil into the pan coating it well.
Stir the batter again and then pour into the hot pan.
Place into the oven and bake for 15-20 minutes or until the top starts to set.
Cover the cake with foil.
Bake for another 25-30 minutes. (The total baking time is approximately 40-50 minutes.)
Check the cake is done by inserting a toothpick and it should come out clean.
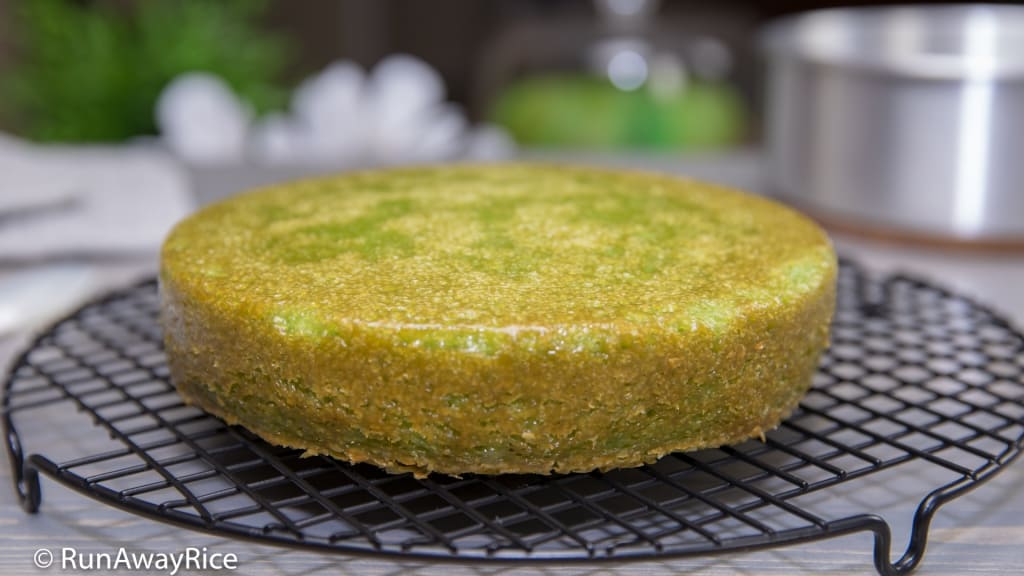
Remove the cake from the oven and let cool for 15 minutes.
Transfer the cake to a wire rack and let cool for 15-20 minutes.
Baking the Cake using an 8 inch x 3 inch Round Cake Pan
Place the 8 inch x 3 inch round cake pan into the oven. Preheat the oven to 350 F (177 C).
When the oven comes to temperature, remove the hot pan from the oven. Brush oil into the pan coating it well.
Stir the batter again and then pour into the hot pan.
Place into the oven and bake for 35-40 minutes or until the top starts to brown.
Cover the cake with foil.
Bake for another 50-60 minutes. (The total baking time is approximately 85-100 minutes.)
Check the cake is done by inserting a toothpick and it should come out clean.
Remove the cake from the oven and let cool for 20 minutes.
Transfer the cake to a wire rack and let cool for 15-20 minutes.
Serving and Storing the Cake
Cut the cake into slices or chunks and enjoy as dessert or a casual snack.
The Honeycomb Cake – Eggless is best enjoyed the day it’s made. For any remaining cake, cover well to prevent drying. Store at room temperature for 1-2 days. Refrigerate for up to 1 week. To enjoy again, warm in the microwave for toaster oven. Freeze for up to 2 months.
Yields: 8 servings

Tools I Love and Use in My Kitchen
Honeycomb Cake - Eggless / Vegetarian Recipe / Banh Bo Nuong Chay
Ingredients
Yeast Mixture
- 2 1/4 tsp active dry yeast , 1 package
- 1 tsp sugar
- 1/4 cup warm water 100 F (38 C)
Cake Batter
- 2 1/2 cups rice flour
- 1 1/2 cups tapioca starch
- 2 cups warm water 100 F (38 C)
- 1 cup coconut milk
- 1 cup sugar
- 1 tsp Pandan paste
- 1 tsp vegetable oil
Instructions
Activating the Yeast
-
In a small bowl, add the active dry yeast, 1 tsp sugar and warm water. Stir together to moisten the yeast.
-
Let rest until the yeast becomes foamy and doubles in volume, approximately 10 minutes.
Making the Batter
-
Add the rice flour and tapioca starch into a large bowl. Add the warm water. Mix together until the batter is smooth and free of lumps.
-
Optionally, strain the mixture.
-
Add the activated yeast to the batter. Mix together combining well. Cover the bowl with a lid or plastic wrap.
-
Transfer to a warm place and let rest for 1 - 1 1/2 hours or until the batter increases 1 1/2 times in volume and is foamy on top.
-
In a microwaveable cup, add the coconut milk and 1 cup sugar. Combine together dissolving the sugar. Microwave on High for 45 seconds.
-
Add the Pandan paste to the coconut milk syrup and mix well.
-
Add the Pandan coconut milk syrup to the batter and mix well.
-
Cover the batter and let rest on the counter for 15 minutes.
Baking the Cake using a 10 inch Tube / Bundt Cake Pan
-
Place the tube / bundt cake pan into the oven. Preheat the oven to 350 F (177 C).
-
When the oven comes to temperature, remove the hot pan from the oven. Brush oil into the pan coating it well.
-
Stir the batter again and then pour into the hot pan.
-
Place into the oven and bake for 15-20 minutes or until the top starts to set.
-
Cover the cake with foil.
-
Bake for another 25-30 minutes. (The total baking time is approximately 40-50 minutes.)
-
Check the cake is done by inserting a toothpick and it should come out clean.
-
Remove the cake from the oven and let cool for 15 minutes.
-
Transfer the cake to a wire rack and let cool for 15-20 minutes.
Baking the Cake using an 8 inch by 3 inch Round Cake Pan
-
Place the 8 inch x 3 inch round cake pan into the oven. Preheat the oven to 350 F (177 C).
-
When the oven comes to temperature, remove the hot pan from the oven. Brush oil into the pan coating it well.
-
Stir the batter again and then pour into the hot pan.
-
Place into the oven and bake for 35-40 minutes or until the top starts to brown.
-
Cover the cake with foil.
-
Bake for another 50-60 minutes. (The total baking time is approximately 85-100 minutes.)
-
Check the cake is done by inserting a toothpick and it should come out clean.
-
Remove the cake from the oven and let cool for 20 minutes.
-
Transfer the cake to a wire rack and let cool for 15-20 minutes.
Serving and Storing the Cake
-
Cut the cake into slices or chunks and enjoy as dessert or a casual snack.
-
The Honeycomb Cake - Eggless is best enjoyed the day it's made. For any remaining cake, cover well to prevent drying. Store at room temperature for 1-2 days. Refrigerate for up to 1 week. To enjoy again, warm in the microwave for toaster oven. Freeze for up to 2 months.
Recipe Video
Notes, Tips & Tricks
- Use fresh active dry yeast. Instant yeast works but the honeycomb is minimal and the texture is not as spongy.
- Let the batter rest in a warm place with the temperature around 85-100 F (29-38 C) to encourage yeast growth. The oven works best as it's enclosed and can be controlled. Turn on the oven light and place the batter bowl close to the light. Another option is to place a pan of boiling water just under the batter.
- Feel free to use any food extract and flavoring you like. Optionally, use food coloring to add pizzazz to the cake. Depending on the occasion or time of year, I'll make a variety of cakes in different flavors and colors.
- Use a thermometer to check the temperature of all liquids. The temperature should be 100-110 F (38-43 C). A temperature high than 130 F (54 C) will kill the yeast.
- Temperatures and baking times may vary with your oven. Adjust the oven rack so the cake is at least 7-8 inches from oven's heating element. The reasoning for this is so the cake doesn't bake too quickly. Time is needed to let the air bubbles surface to the top, thereby creating the honeycomb. If your oven has both top and bottom heating elements, center the cake in the oven. Bake using conventional heat. Convection or fan-forced dries out the cake.
I found that wrapping a piece of leftover cake in a damp paper towel and 30 seconds in the microwave brings it right back to the texture as when it came out of the oven. Very yummy recipe.
This recipe came out really badly for me and I’m not sure what happened. It was so so sticky, stuck to the bundt pan, and did not have the honeycomb shape at all. It looked like goo. I’m wondering what I did wrong on this. I used tapioca flour (Bob’s Red Mill); could that be the problem? I also used the glutinous rice flour. It wasn’t clear whether I should use glutinous or regular rice flour. Pretty disappointed. I wanted an eggless version since the other recipes require like 6-8 eggs.
Hi Michelle,
Use regular rice flour. It makes a huge difference in the texture of the cake.
Hi chi I made it but I forgot to cover the yeast mix while resting for 15 min . I’d baked the steps and time you’d suggested . The top came out dry and the middle was raw . Baking time was 50 minutes. What did I do wrong ? Please help . Lol
Dear Trang,
Thank you for your recipe. What should I do to get brown color without food color? I did use palm sugar instead of regular sugar but I didnt get the different result.
Many thanks.
Hi Wendy,
If you would like a rich brown color, I suggest using dark brown sugar. Give it a try and share your results. Good Luck!
Hi Trang,
I made the Honeycomb Cake as dessert for a vegetarian dinner for my in-laws. They were so impressed with all the honeycomb in the cake. The cake was pillowy soft. Thanks so much for the recipe! I need to make another cake now. 🙂
Hi Debbie,
That’s wonderful to hear your vegetarian Honeycomb Cake was a hit at your dinner party. Great job to you and thanks for sharing your results! 🙂
Hello Trang. I love pandan taste but it’s har to find in Sweden. Bought some Butterfly pandan extract on eBay. It’s terrible green and doesnt taste so much. Wich extract do you think is the best?
Hi Maria,
I like the Koepoe Koepoe Pandan paste https://amzn.to/2pM61UX Another good option is the McCormick Buco Pandan https://amzn.to/2Gw9NLB This one is not as concentrated as the paste and is clear. Hope that helps!