
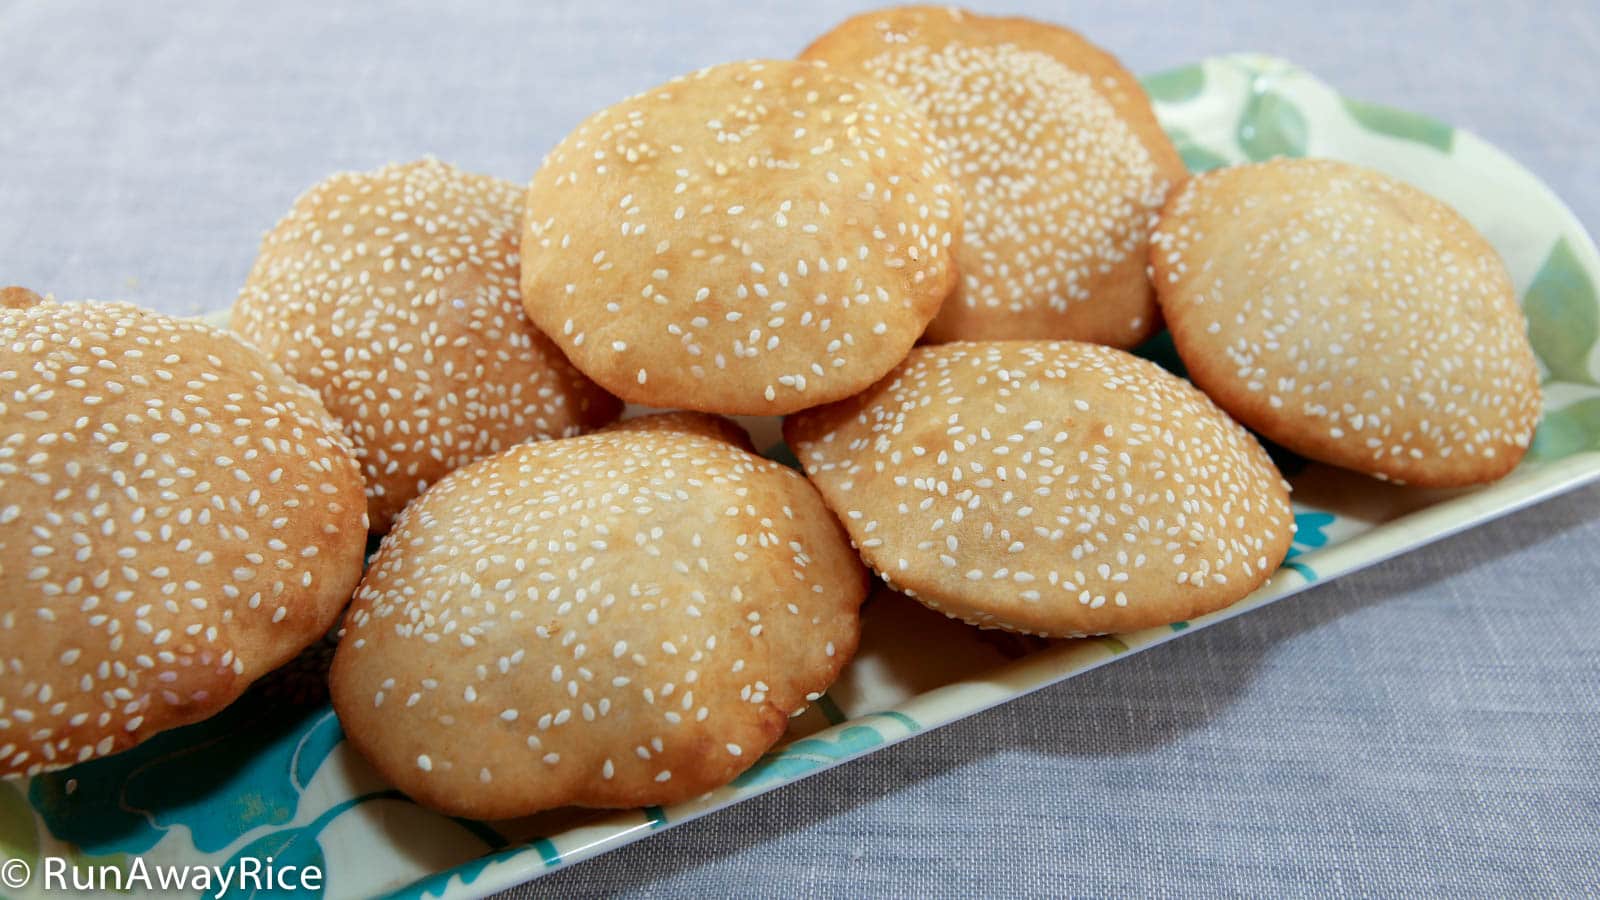
I simply adored these donuts, but because they’re deep-fried, I don’t make them very often. So when I allow myself to indulge and make them at home, (usually for the holidays) they’re a special treat. There’s really nothing fancy or exotic about these donuts–no crazy toppings or colorful fillings. The recipe is simple–the slightly sweet dough is dipped in white sesame seeds and then fried until it’s puffy and golden. The results are beautiful and so scrumptious. I hope you enjoy the recipe for this classic Viet treat!
Notes on the Recipe, Tips and Tricks
If you’ve attempted these donuts in the past without success, you already know they can be a bit tricky to make. There’s quite a bit of technique involved with making the dough and then frying the donuts to get them puffy with the hollow center. I share lots of tips in the video but will mention them here again.
The consistency of the dough should be slightly tacky but not wet and sticky. You should be able to work the dough in your hands without it sticking to your fingers. In the recipe below, I added an additional 2 Tbsp self-rising flour to get the dough just right.
The dough dries out quickly so keep the balls covered with the plastic wrap until you’re ready to roll them.
Use plenty of vegetable oil for deep-frying. (This helps to make the donuts nice and puffy.) The oil should be 1 1/2 to 2-inches high in the pot you’re using. Use a smaller pot so you don’t have to use so much oil. In the video, I use a 3 quart non-stick pot with 6 cups of canola oil.
The oil temperature is very important. Ideally it should be 360 degrees Fahrenheit. A temperature range of 355-370 degrees Fahrenheit is just fine. Use a thermometer to check the temperature and adjust as needed. If you have an electric fryer, it will make the task that much easier. On my stove, I set the heat to Low and make minor adjustments as I am frying to maintain the right temperature range.
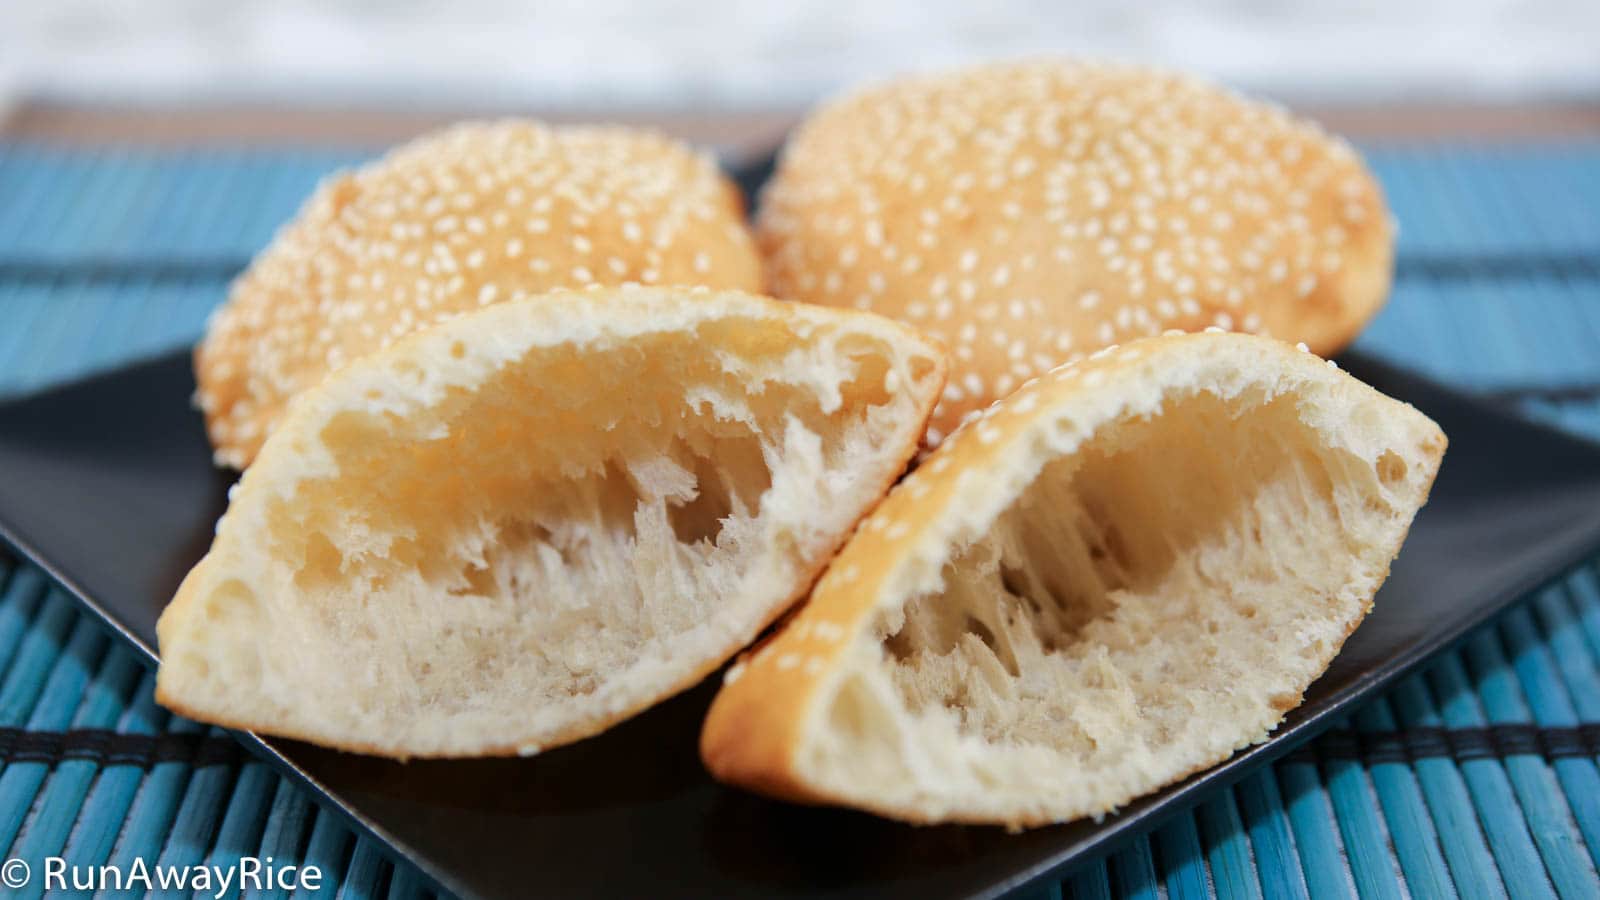
There’s definitely a technique to frying these donuts so they puff up. Be sure to flip them constantly once they float to the top. If you’re slow with flipping, your donuts will be lopsided. Also be careful when flipping them as you don’t want to puncture them with your chopsticks.
Fry the donuts one at a time. It doesn’t take long but you’ll have better results as too many donuts frying at the same time are difficult to time and affect the oil temperature.
If your donuts are not puffing up in the center, don’t despair. Here’s a really easy trick: Dip a pastry brush in water and then blot the excess on a towel. Lightly moisten both sides of the dough. Deep-fry as directed and they should be nice and puffy. Be careful not to add a lot of water as this will cause the oil to pop and splatter.
This recipe works great with a bread machine. Add all of the ingredients and then use the Dough setting. The bread machine will mix for half an hour and then rest for 1 hour. During the mixing process, scrape the sides of the bowl and make sure all the dry ingredients get incorporated.
Can’t find self-rising flour? You can make your own as follows: Add 1 1/2 Tbsp baking powder + 1 1/2 tsp salt to a measuring cup. Fill the rest of the cup with all-purpose flour and level. Pour into a separate bowl. Measure out 2 more cups of all-purpose flour and add to the bowl. Combine everything together. You now have 3 cups of self-rising flour.
If you want to weigh the dough, the balls are approximately 2 oz each. The donut will be approximately 5-inches in diameter and approximately 1/4-inch thick once rolled. The recipe yields approximately 12 donuts.
Store any leftovers in a re-sealable plastic bag and refrigerate. To reheat, place in a toaster oven and warm for 5 minutes or microwave on High for 15-20 seconds. The donuts can also be frozen and enjoyed later. Place in a plastic bag, squeeze out all the air, seal and then freeze. To reheat (there’s no need to defrost), simply wrap the donuts in foil and place in the oven at 350 degrees Fahrenheit for 10 minutes or until they’re nice and hot. Remove the foil and bake for another 2-3 minutes if you’d like them to be a bit crispy.
[fbshare url=”http://youtu.be/ASvVU1idfnQ” type=”button” float=”right”]Watch the video below for instructions.
If you enjoyed this recipe, you may also like: Sesame Balls (Banh Cam) and Steamed Rice Cakes/Cow Cakes/Steamed Honeycomb Cakes (Banh Bo Hap).
Ingredients
3 cups self-rising flour + 2 Tbsp (adjust as needed)
1/2 cup sugar
1 packet vanilla sugar
1 tsp baking powder
1 cup low-fat milk
1/2 cup white sesame seeds
vegetable oil for deep-frying
2 Tbsp self-rising flour for rolling
Directions
Add the self-rising flour, sugar, vanilla sugar and baking powder into the stand mixer with the dough hook attachment. Mix on Low speed for 30 seconds. Gradually add in the milk and continue mixing on Low speed. Scrape the sides of the bowl using a spatula to work in the dry ingredients.
Increase the mixer speed to Medium and mix for 5 minutes. Check the dough and if it’s too sticky, add 1 Tbsp of flour and then mix for 1 minute. (Repeat and add more flour if necessary.) The dough should be soft, moist and slightly tacky but not sticky. Dust your hands with flour. Gently work the dough in your hands for about 1 minute smoothing it out and patting it into a ball. Place the dough into a clean bowl and cover with plastic wrap. Place the bowl into the oven and let the dough rest inside the oven with the light on for 1 hour.
Lightly flour the work surface and then scoop out the dough. Gently knead the dough for about 1 minute. Roll the dough into a log. Cut the dough in half and then cut each half into 6 equal pieces. Shape each section of dough into a ball. Place all the balls onto a baking tray lined with parchment paper. Cover the tray with plastic wrap and then let rest in the oven for another 15 minutes.
Flour the work surface and rolling pin. Take a ball of dough and press both sides into the sesame seeds. Lightly flour each side as well. Use a rolling pin to roll the dough into a flat circle approximately 5-inches in diameter and a little less than 1/4-inch thick. Set the dough aside on parchment paper. Continue until all 12 donuts are made.
Add oil into a saucepan and make sure the oil is at least 1 1/2 to 2-inches high. Heat the oil until it reaches 360 degrees F. Gently place the dough into the hot oil. Use chopsticks to move the dough around slightly so it doesn’t stick to the bottom of the pan. In about 10 seconds the donut should float to the top. Quickly flip the donut over, cook for 2 seconds and flip it over again. Continue flipping the donut until the center puffs up completely. Fry the donut for another minute, flipping every 15 seconds, until both sides are golden brown. Remove the donut and place on paper towels to soak up the excess oil.
Continue frying until all donuts are made. Serve while they’re warm. Enjoy!
Yields: 12 donuts


Hi Trang, thank you for sharing this with us. Can you tell us anything about the history of Banh Tieu? Who created them. Was it for special occasions? Have they been made for centuries, or only recently?
Hi Trang!
In store, they only sell a container of vanilla sugar and not packets.
How much of vanilla sugar is in a packet.
I hope you can help me.
Hi Macey,
One packet vanilla sugar is 8 grams or 2 teaspoons. Good Luck!
Hi, co Trang! I live in Monterey, CA. Would you please give the address and telephone number of the store so I can order the Vanilla Sugar packets?
Thanks I like your Hollow Donuts Video.
Hi Nick,
I provided 2 links to Amazon to purchase the vanilla sugar online. Please let me know if that works for you.
Great stuff, I have been making this for four days straight. I couldn’t get and self raising flour so I just used all purpose flour instead and it still turned out great, not as airy inside but still yummy nonetheless. Already got request for more for lunches… thank you
Great job! I am glad to hear you tried it with all-purpose flour. Thanks for taking the time to share your results.
Another awesome recipe from you. Thank you. I tried to make it for the first time and it was a success, all of my friends loved it. I used your tip and all of the donuts are so puffy. However I felt like the donuts are not soft enough like what I had in Vietnam. I think the dough didn’t rise enough?
Hi, you’re very welcome! Yes if the dough doesn’t rise fully, the donuts may have a firmer texture. Also make sure to use fresh self-rising flour and baking powder. It makes a huge difference. Good Luck!
Hello Trang
I tried last weekend but the recipe didn’t turn out good. The dough was not pliable but the color was very nice white.
I was trying to find out where I went wrong?
1) could it be my mixer was not strong enough for the dough to be pliable?
2) should the milk be warm instead of cold?
3) I followed your recipe of making self rising flour. I used 11/2 tbsp baking powder and 11/2 tsp salt and filled the rest of one cup of all purpose flour the plus 2 cups of all purpose flour. Is that enough baking powder. I checked on Internet I need more.
Can you help me to see where I went Wrong. I am trying to make it again this weekend.
Thank you.
Hi Phuong,
The dough should be soft and slightly sticky just after mixing. After the dough rested, was it soft and pliable?
1) The mixer should be strong enough to knead the dough and develop the glutens. You can knead further by hand.
2) The milk should not be ice cold. Room temperature is good.
3) That’s all I use to make self-rising flour. Keep in mind there’s also 1 tsp baking powder in the recipe as well. One other tip, baking powder settles, so make sure you shake your can or mix the contents well before using.
Good Luck and I hope they turn out well for you this weekend! 🙂
Trang.
Can I substitute low fat milk with almond milk or soy milk or water.
Thank you
Hi Phuong,
You can definitely use almond milk or soy milk in place of the low-fat milk. Water just doesn’t have enough substance. Good Luck!
Hello there!
I used dry yeast instead of self rising flour , because i like to smell of it.
First time i do it with dry yeast it turned out well.
2nd time i did it, my dough did not rise at all. i mixed the dry yeast with luke warm water and 2 tpsp of sugar, it was rise well. Is it because i put too much sugar, 3 cups of flour + 1 cup of sugar. I researched about it and they said the sugar absorbs liquid as much as it can, and thirsty yeast is left high and dry, and simply goes dormant.
Is there any solution to my issue? If i put less than 1 cup of sugar, i don’t really taste the sweet.
Thank you!
Hi Kimmy,
It’s difficult to say what the issue is with the yeast. You said it worked the first time but not the second time. What was different? Often times the ambient air temperature can affect rising dough.
Where can I buy self rising flour
Hi Michele,
Any American grocery store should carry self-rising flour. Some brands to look for are Pillsbury and Gold Medal. I also shared how to make your own self-rising flour in the post.
Good Luck!
Hi! I recently came across this recipe and I was curious about it. What temperature do we set in the oven when the dough is resting for one hour?
Hi Phuong,
I don’t turn on the oven, just the oven light and that provides the warmth for the dough to rise. Hope that helps!
I tried your recipe and it was absolutely delicious! =D
Thanks Ann! I am glad to hear you enjoyed the recipe. I love making these and watching them puff up 🙂